Complete Guide on How to Get and Use GPT-4 API Key for Python API Integration
Complete Guide on How to Get and Use GPT-4 API Key for Python API Integration
Have you ever wondered how to get GPT-4 API keys and use them in your coding projects? If you’re a developer looking to integrate OpenAI’s latest and most advanced language model, GPT-4, into your Python applications, then you’re in the right place! In this guide, we’ll walk you through everything you need to know about obtaining and using a GPT-4 API key.
Here’s what you’ll learn:
- Why it’s important to use GPT-4 in your applications
- How to get a GPT-4 API key
- Steps to integrate GPT-4 API with a Python application
- Common troubleshooting tips and best practices

Why Use GPT-4 API?
GPT-4 is an incredible language model developed by OpenAI, known for its advanced capabilities in understanding and generating human-like text. Using this API can significantly enhance your applications’ functionalities, whether it’s for chatbots, content creation, or any other project requiring natural language processing.
How to Get a GPT-4 API Key
Step 1: Create an OpenAI Account
The first step in getting a GPT-4 API key is to create an account on the OpenAI platform. Visit https://platform.openai.com/signup to register. Ensure you provide a valid email address, as you will need to confirm it.
Step 2: Verify Your Email Address
After signing up, check your email for a verification link from OpenAI. Click on the link to verify your email address. This step is crucial to activate your account.
Step 3: Access the API Section
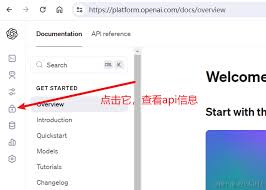
Once your email is verified, log in to your OpenAI account and navigate to the API section by clicking on your account menu and selecting “API keys”.
Step 4: Generate Your GPT-4 API Key
In the API keys section, click the “Create new API key” button. Make sure to copy and securely store this API key, as it will only be displayed once. Use a password manager to keep it safe.
Step 5: Upgrade Your Plan If Necessary
Access to GPT-4 requires a paid plan. Go to the billing section and select a suitable payment plan. Follow the instructions to complete the payment. You’ll now have access to the GPT-4 API.

Integrating GPT-4 API with Python
Step 1: Install the OpenAI Python Package
To start using GPT-4 in your Python application, install the OpenAI Python package. Run the following command in your terminal:
pip install openai
Step 2: Set Up Your API Key
Use your GPT-4 API key in your Python script. Add the following code to your Python application:
import openai

openai.api_key = 'your-api-key-here'
Step 3: Make Your First API Call
Now, you can make a request to the GPT-4 API. Here’s a simple example:
response = openai.Completion.create(
  model="text-davinci-004",
  prompt="Translate the following English text to French: 'Hello, how are you?'",
  max_tokens=60
)

print(response.choices[0].text.strip())
Step 4: Handle Errors and Responses
Always handle potential errors in your API calls to ensure your application is robust. Here’s a basic structure:
try:
    response = openai.Completion.create(...)
    print(response.choices[0].text.strip())
except openai.error.OpenAIError as e:
    print(f"An error occurred: {e}")

Common Troubleshooting and Best Practices
- Check API Key: Ensure that your API key is correctly set and not expired.
- Review Usage Limits: Be aware of the API usage rate limits and ensure your application stays within them.
- Monitor Costs: Regularly check your billing to avoid unexpected charges.
- Read Documentation: Refer to the OpenAI API documentation for detailed guidance and examples.
- Use Secure Storage: Always securely store your API keys to prevent misuse.
Frequently Asked Questions
Q1: Can I use GPT-4 API for free?
A: No, using the GPT-4 API requires a paid plan. Free plans are limited to lower-tier models like GPT-3.5.
Q2: What are the rate limits for GPT-4 API?
A: Rate limits depend on your subscription tier. For detailed information, refer to the OpenAI API documentation.
Q3: How do I handle errors while using the GPT-4 API?
A: Implement error handling in your code to catch and manage errors gracefully. Refer to example code sections for guidance.
Q4: Can I share my API key with others?
A: No, your API key is private and should not be shared. It represents your personal access and usage.
Q5: How can I secure my API key?
A: Use password managers and environmental variables to securely store and manage your API keys.

Conclusion
Recap: Getting and using a GPT-4 API key opens up powerful possibilities for your applications. Whether you want to create smarter chatbots, generate creative content, or solve complex tasks with natural language processing, GPT-4 can be a game-changer.
Action Step: Go ahead and create your OpenAI account, generate your GPT-4 API key, and start integrating it into your Python projects today!
Leveraging the capabilities of GPT-4 will not only enhance your application’s performance but also give you a competitive edge in the tech landscape. Happy coding! 😊